Tableau Desktop Fundamental Tutorial 4: Organizing Your Data
A. Using Group
A group is a set of dimensions numbers combined into higher level category. For example, this
could be several smaller states grouped as “region”, or similar products grouped in a single
category.
Groups are useful for simplifying the display data when working with large numbers of dimension
members.
Here are three methods to create a group:
1. Create a Group from the View
- CTRL+click to select several dimension labels in the view, and then click the Group icon. You
can find the Group icon on the toolbar, within the tooltip, or with a right click. The new group appears in the data window. - If you want to add or remove group members, in the data window, right click the new group, choose Edit group, and edit the members.

- Right click a dimension in the data window, and then select create group.
- Select a group of marks in the view and click the Group icon in the tooltip. This allows you to group on a single dimension. Using visual grouping allows you to show items as members of group without losing their labels or individuality. If there are multiple dimensions in the view, you can choose other dimensions in the view or All Dimensions
Note: You can also right click on the marks and select Group from the menu.

The new Group is placed on Color. Items not part of the group are designed as “Other”.

B. Creating and Using Hierarchies
Data organized into hierarchies is common in database. An example of a hierarchical structure is geographic data, with country at the top of the hierarchy, followed by Region, State, and then Zip code.
In Tableau, dates automatically generate a hierarchy, which means users can drill up and down
using the plus and minus signs.
Using tableau, you can manual generate a hierarchical structure in your data window from any dimension. When you create dashboard using views containing hierarchies, user can click a plus (+) sign and drill into the data to display more details based on the hierarchy you created.

Here are two ways to build a hierarchy.
1. Build a Hierarchy Using Drag and Drop
- Drag and drop the child field onto parent field in the Data window.
- (Optional) Name the hierarchy (for examples, “Product Line Hierarchy”)

2. Build a Hierarchy Using Context (Right-Click) Menu
- In the Data Window, CTRL-click to multi-select the fields to add to the hierarchy
- Right click and choose Create Hierarchy

Note: Using right click puts fields in alphabetical order, not necessarily the appropriate hierarchical order. You can re-order the field by dragging and dropping them into place
C. Practice: Creating Groups and Hierarchies
Download this file Creating_Groups_and_Hierarchies_Starter.twbx and create a view according to the following specification:
- Has a group named “Desk Supplies” that includes the following members: Envelopes, Pens & Art Supplies, Scissors, Rulers and Trimmers, Labels, Rubber Bands
- Hierarchy named Product with following dimensions in this order: Department Category (Group), Category Item
- Category (group) is drilled down one level so it displays Category in the view.
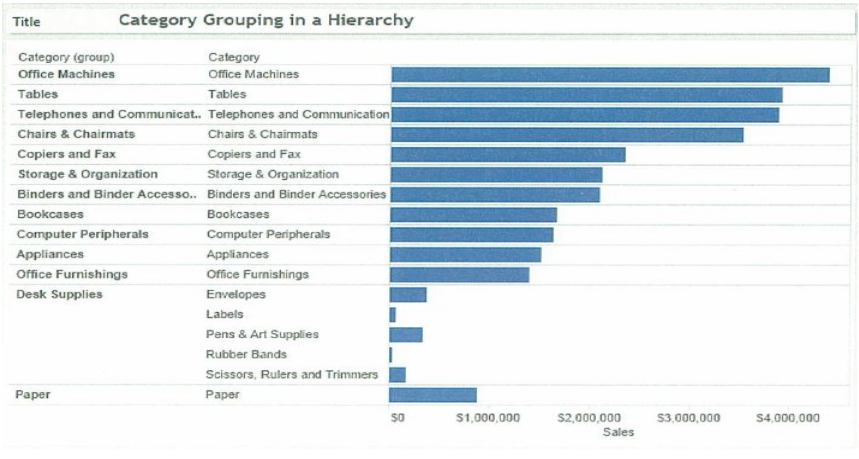
- Create a Group from the following items in Category: Envelopes, pens & Art Supplies, Scissors, Rulers and Trimmers, Labels and Rubber Bands.
- Category is replaced on Rows Shelf by Category (group), and a dimension titled “Category (Group)” is added to the Dimensions area of the data window.
- In the view, rename the label for the new group: “Desk Supplies”
- Create a hierarchy called “Products” in the Data window Organized as follows: Department, Category (group), category, items.
- In the view, drill down in the Category (group) to category.
- Download this file Creating_Groups_and_Hierarchies_Starter.twbx
- SHIFT + click to select these items near the bottom of the vertical axis: Envelopes, Pens, & Art Supplies, Scissors, Rulers and Trimmers, Labels, Rubber Bands.
- Right-click the selected items, and select Group
- In the view, right click the new group and click edit Alias
- Type Desk supplies as the name, and click OK
- Select and drag category (group) onto Department in the Data window to create a hierarchy. In the Create hierarchy dialog box enter “Products” and click OK.
- Click and drag category into the products hierarchy, placing it below Category (Group).
- Click and drag item into the products hierarchy, placing it below category.
- On the rows shelf, click plus (+) next to category (group) to expand to Category.
D. Practice: Creating Visual Groupings
Download this file Creating_Visual_Grouping_Starter.twbx and create a view according to the following specification:
- Has a visual group named “Desk Supplies” using the following Category: Envelopes, Pens & Art Supplies, Scissors, Rules and Trimmers, Labels, and Rubber Bands.
- Has a visual group named “Machines” with Office Machines, Copiers and Fax and Computer Peripherals.
- All others are grouped as “Other”.

- Select the bars for Envelopes, Pens & Art Supplies, Scissors, Rules and Trimmers, Labels, and Rubber Bands, and create a group named “Desk Supplies”
- Select the bars for Office Machines, Copiers and Fax and Computer Peripherals, and create another group named “Machines”
- Download this file Creating_Visual_Grouping_Starter.twbx
- CTRL + click each of the following bars: Envelopes, Pens & Art Supplies, Scissors, Rules and Trimmers, Labels, and Rubber Bands. TIP: Make sure to select the bars, not the text.
- With these items selected, right click and choose group.
- CTRL + click to select the bars that represent each of the following: Office machines, copiers and fax, and computer peripherals. TIP: Make sure to unselect the group you just created.
- With these items selected, right click and choose group
- In dimension in the data window, right click category (group), and choose Edit Group.
- In the Edit Group dialog box select Envelopes, labels, Pens & Art Supplies and 2 more; click Rename; type “Desk Supplies” and press Enter.
- In the Edit Group dialog box select Computer Peripherals, Copiers and Fax, Office Machines; click Rename; type “Machines” and press ENTER.
- Click OK


your post is great!
ReplyDelete
ReplyDeletePretty great post. I simply stumbled upon your blog and wanted to mention that I have really loved surfing around your blog posts. Great set of tips from the master himself. Excellent ideas. Thanks for Awesome tips Keep it
corelcad-build-crack
tableau-desktop-crack
kindlian-crack
autodesk-sketchbook-pro-crack
gilisoft-audio-toolbox-suite-crack
Ableton Live Suite crack
ReplyDeleteTableau Desktop crack
Jaf Box crack
I really liked your blog post.Much thanks again. Awesome.
ReplyDeleteTableau Online Course
Tableau Online Training in Hyderabad